
The WRE54G is an 802.11g wireless repeater that has been sold by Linksys for several years. I bought a few of them, anticipating that they could be useful for boosting larger networks. These extenders have two major problems. Firstly, they only work with a few Linksys routers, so forget about using them with your Netgear or Buffalo router. The second and more serious problem is that they just don’t work very well. I found that they dropped network connections many times a day, making them pretty much worthless. So the WRE54Gs went into my closet, until recently when I discovered that the brave souls in the DD-WRT community had managed to squeeze their awesome firmware onto these little beasties. To date, no one has created a step by step tutorial for converting your WRE54G over to DD-WRT. Hopefully this will allow more people to rescue their repeaters from the trash heap.
This tutorial is broken into six parts, for the sake of clarity. The parts are as follows:
- Part 1 – Preparing for the tutorial
- Part 2 – Upgrade to the latest Linksys firmware
- Part 3 – Install DD-WRT
- Part 4 – Update DD-WRT to the latest version
- Part 5 – Configuring the WRE54G to work as an extender
Its pretty important that you don’t skip steps if you want your WRE54G to function properly. Only step 5 is optional.
Part 1: Preparing for the Tutorial
Things to Download
For this tutorial, I recomend having two computers available. If you are using one computer, for most of the tutorial you will not be able to access the interent. Make sure you download all the files below, and have a copy of the tutorial printed out or saved for reference. I am including the original links, plus a mirror in case the original sources go down. If you are the owner of one of these files and do not want me to host it, please contact me and I would be glad to take it down.
- The latest official Linksys firmware version 1.06 available here (linksys.com) or here (Jozerworx mirror).
- Initial DD-WRT flashing file (thanks to dvlad666) available here (dd-wrt.com) or here (Jozerworx mirror).
- Latest version of DD-WRT available here (dd-wrt.com) or here (Jozerworx mirror).
Checking to see if you have a Revision 1 Device
Linksys made three hardware revisions of the WRE54G. For the most part, they look and function identically, but the important distinction is that DD-WRT can be installed only on Revision 1 devices (hereafter “v1”). Hardware revisions 2 and 3 are completely incompatible with DD-WRT. Do not attempt this tutorial with a version 2 or 3 device, at best, you will waste some time, at worst, you will break your expensive wireless extender. Here is how to determine what hardware revision you have.
- Look at the front and bottom of the device. There should not be an ethernet port. If there is an ethernet port, than you have a version 2 or 3 device and cannot follow this tutorial.
- Flip the WRE54G over and look at the back label. You should see a box labeled “Model Np”. If the box says just”WRE54G“, then you have a version 1 device. If the box says “WRE54G v2“, “WRE54G v3“, or anything else, then you have a later revision device.
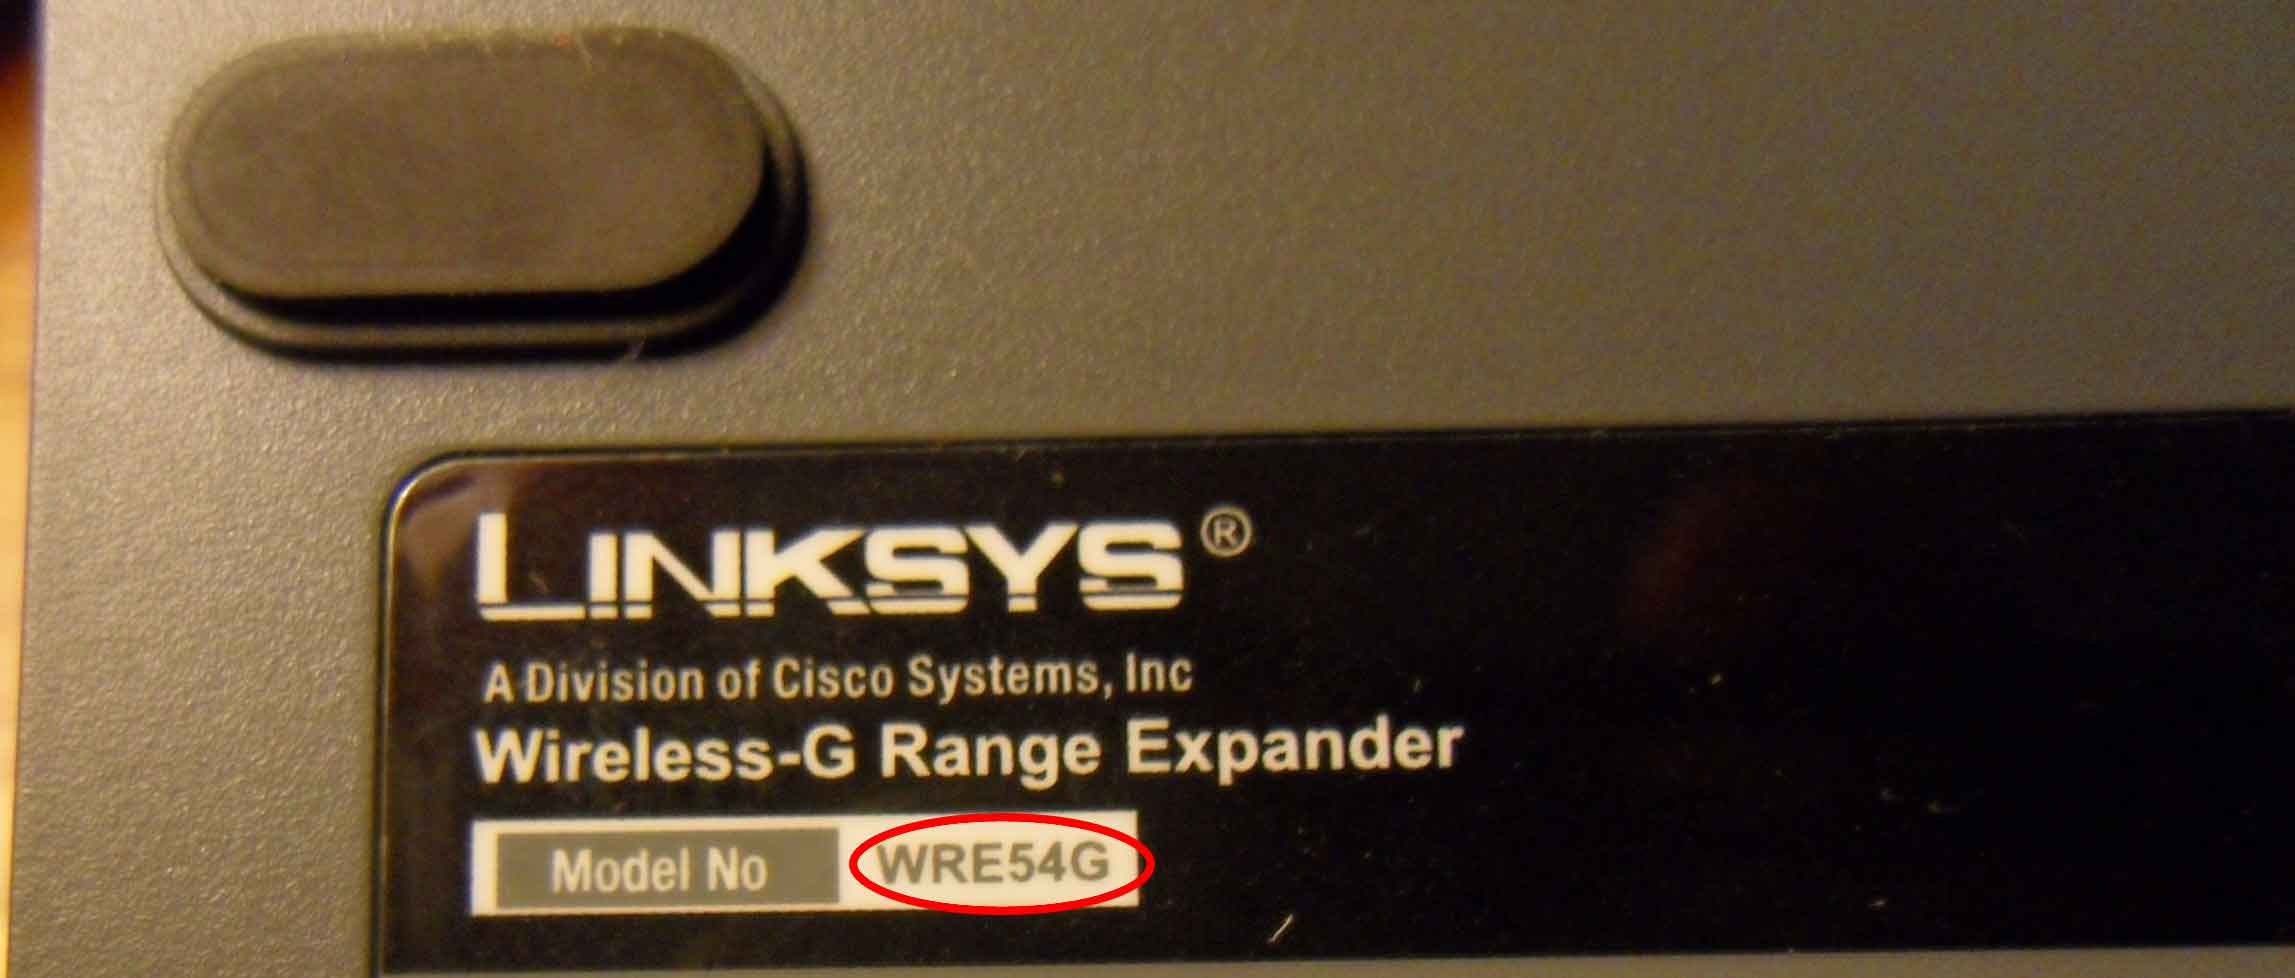
- While you are looking at the back of your device, note down the MAC address, which should be a 12 digit code near the bottom of the label.
- If your device passes both tests, then move on to the next step.
Part 2: Upgrade to the latest Linksys firmware
What you will Need
- A computer with 802.11 network capability
- Linksys WRE54G version 1 device
- The latest Linksys firmware file
Step by Step Instructions
In order to convert your device to DD-WRT, you must be running the latest Linksys firmware. I have tried converting devices running older firmwares, and it did not work. If you know that your device is already running the 1.06 version firmware, then you can skip this step.
- Plug the WRE54G into the wall.
- Push the recessed “Reset” button with a narrow object, such as an automatic pencil or an unbent paperclip. Hold the button down for 5 seconds.
- Unplug the router for 10 seconds, then plug it back in.
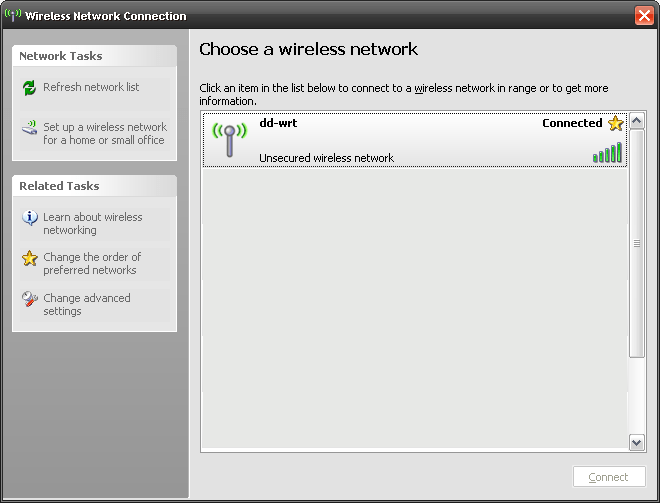
- On your computer, scan for wireless networks. You should see one labeled linksysR123456 where 123456 is replaced by the last 6 digits of your WRE54G’s MAC address.

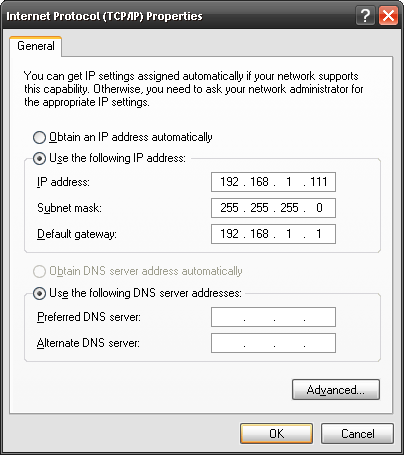
- Set your IP address to a static value of 192.168.1.111. How to do this will vary depending on what operating system you are using. In Windows XP, the procedure is something like this:
- Go to Control Panel->Network Connections->Wireless Network Connection (or however you access your network adapter settings). Click on the Properties button, select “Internet Protocol (TCP/IP)”, then click Properties again. Select “Use the following IP address” and enter the following settings.

- Click Ok to all the network property windows.
- Open your wireless network selection window, and connect to the LinksysR123456 wireless network your found.
- Open a browser window, enter the following address: 192.168.1.240
- If things are working correctly, you should be asked for a username and password. The username should be left blank, the password is“admin”.
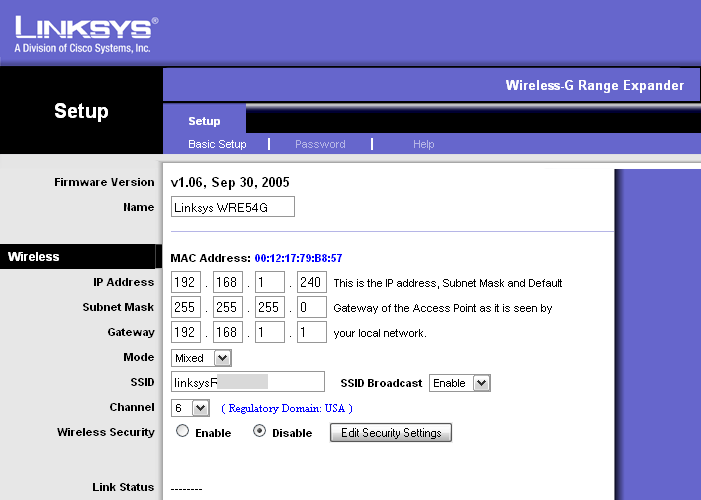
- Once you enter the user credentials, you should be greeted with a configuration page.

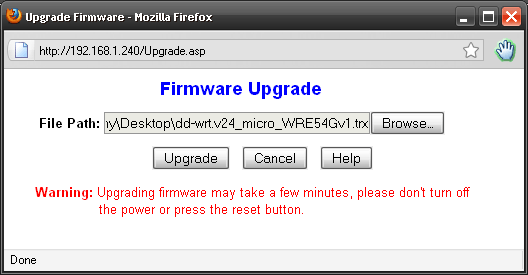
- Click on the “Help” tab, and click the “Firmware Upgrade” button. A new window will pop up.
- Select the Linksys 1.06 firmware image you downloaded earlier (LinksysWRE54G_1.06.05-hdr.trx), and click “Upgrade”.
- Nothing will happen for 2-3 minutes. DO NOT DO ANYTHING. When the process is over, the window status will change to “Upgrade Complete”

- If you get the upgrade complete window, go on to the next step.


Part 3: Install DD-WRT
What you will Need
- A computer with 802.11 network capability
- Linksys WRE54G version 1 device
- The initial DD-WRT firmware file
Step by Step Instructions
In this step, we will install a special version of DD-WRT that can be flashed from the Linksys’s web interface. This version is relatively old, so I highly recommend following steps 4 and 5 after this which will upgrade the firmware to a newer, more stable version.
- After upgrading to the latest Linksys firmware, you should still be able to access 192.168.1.240
- Click on the “Help” tab, and click the “Firmware Upgrade” button. A new window will pop up.
- Select the initial upgrade image (dd-wrt.v24_micro_olsrd_generic_10549_WRE54Gv1-dvlad666.trx) you downloaded earlier, and click “Upgrade”.

- Nothing will happen for 2-3 minutes. DO NOT DO ANYTHING. When the process is over, the window status will change to “Upgrade Complete”.
- If you get the upgrade complete window, go on to the next page.
Part 4: Update DD-WRT to the latest version
What you will Need
- A computer with 802.11 network capability
- Linksys WRE54G version 1 device
- The latest DD-WRT firmware file
Step by Step Instructions
This step is very important. The version of DD-WRT you just installed is old and buggy. You will want the latest version if you want your device to operate trouble free. Either use the “latest version” linked on the first page, or go to dd-wrt.com and download the latest recommended “micro generic” build for Broadcom devices. Theoretically, most Broadcom builds under 2mb should work. If you don’t understand the last two sentences, just use the file linked on the first page.
- Go back to your wireless network selection page. Search for new wireless networks. You should see a network labeled “dd-wrt”. Connect to it. It may take a minute or two for the upgrade process to complete. If you don’t see the dd-wrt network right away, keep refreshing, it should show up soon.

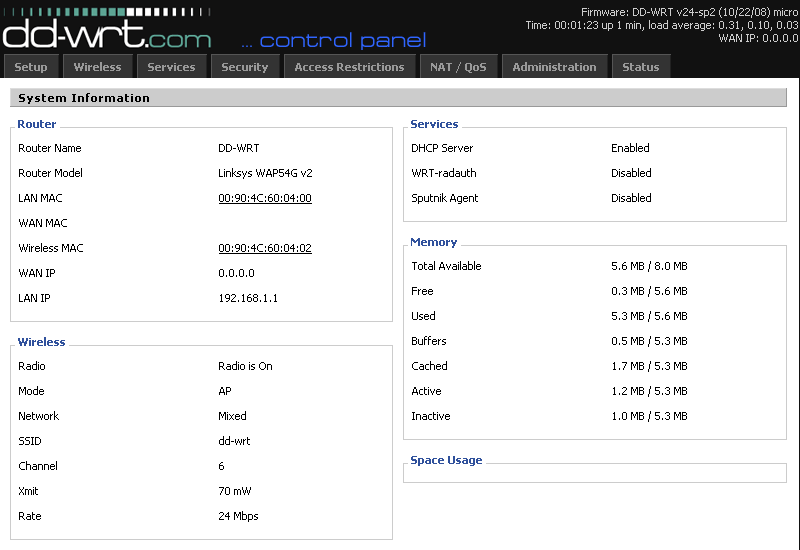
- In a browser, go to 192.168.1.1, you should get a page like this:

- Perform a 30/30/30 reset. This means, while the router is powered on, press the reset button for 30 seconds. While holding the button down, unplug the router and wait 30 seconds. Continuing to hold the button down, plug the router back in and wait 30 seconds. Finally, you can release the button. Exact timing is not important, but err on the side of caution.
- Reconnect to the “dd-wrt” network, and use a browser to go to 192.168.1.1. You should get the same page as last time.
- Create a username and password, it doesn’t really matter what, as long as you can remember it for the next five minutes.
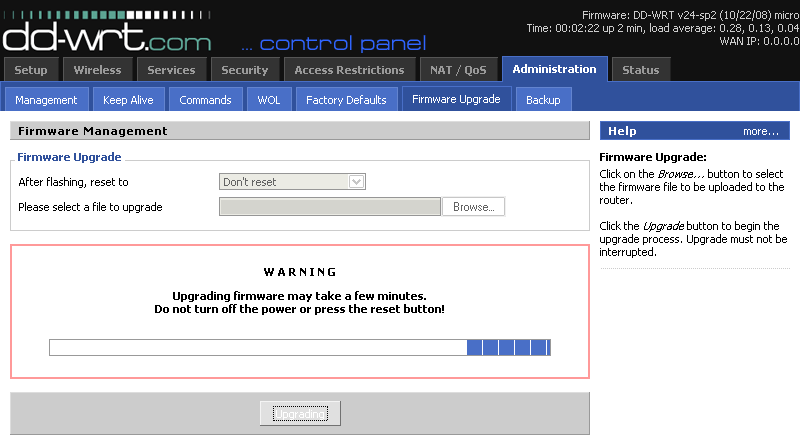
- Click on the “Administration” tab
- Click the “Firmware Upgrade” sub-tab
- Select the latest firmware you downloaded, and click Upgrade. Wait 5 minutes (this is important).

- Do a 30/30/30 reset (make sure you wait 5 minutes after the previous step!)
- Reconnect to the “dd-wrt” network from your computer, and go to 192.168.1.1 in your browser.
- Create your final user name and password.
- Now, your WRE54G is ready to use! See below for some tutorials on how to set it up as a repeater.
Your computer is still set to use a static IP. Make sure you go back into your network settings and tell it to automatically obtain an IP address before you reconnect to your normal network, or else you could run into connectivity issues.
Step 5 will tell you how to set up your WRE54G as a wireless extender using DD-WRT. If you already know how to do this, or have other plans in mind, feel free to skip step 5.
NOTE!!! – It has been found that after flashind DD-WRT, all WRE54Gs are converted to the same MAC address; 00:90:4C:60:04:00. This is only a problem if you plan on using two or more WRE54Gs on the same network. You can easily change the MAC address by doing the following:
- Go to the web interface at 192.168.1.1
- Click the “Administration” tab
- Click the “Commands” sub-tab.
- In the “Commands” box, enter
nvram set et0macaddr=00:11:22:33:44:55
- Of course, replace the “00:11:22:33:44:55” with whatever MAC address you would like. The MAC address on the back label is ideal, since you have a reasonable guarantee that nobody else is using it.
- Click the “Run Command” button.
- After waiting a few seconds, unplug the WRE54G, and plug it back in.
Part 5: Configuring the WRE54G to work as an extender
Introduction
Since the WRE54G does not have any ethernet ports, I can’t really see much use for it besides its original purpose of being a wireless network extender. Now that you have DD-WRT, it might actually work well. There are two ways of configuring a wireless network extender using DD-WRT. Both have advantages and disadvantages.
Repeater Bridge Mode
In this mode, the WRE54G “pretends” to be a regular computer, then creates its own access point. The nice thing about this mode is that you can create an extender for any wireless network you have access too (public networks like Starbucks, although this is probably not legal). The downside to this mode is that you will have two wireless networks, the original, and the extender network.
A very good tutorial is available at: http://www.dd-wrt.com/wiki/index.php/Repeater_Bridge
WDS Mode
WDS mode will create a mesh network with your main router that will make transitioning from the main network to the extender very transparent. The downsides are that it is harder to set up, and that it will not work with all routers.
A very good tutorial is available at: http://www.dd-wrt.com/wiki/index.php/WDS_Linked_router_network
DD-WRT offers a huge amount of customization potential. Feel free to play around with other options and tutorials to expand the functionality of your router. Keep in mind that with great power comes great responsibility, it is possible to mess up your router or network by fiddling with things in the wrong way. Luckily, a 30/30/30 reset will almost always fix any mistakes. Happy hacking!
Gerardo September 22, 2015
Hi, I’m trying to download the latest firmware for the wre54g but the link on your post is broken, could you repost the firmware?
Regards
Doverboy May 4, 2016
Thanks for publishing this tutorial. I’ve been wanting to revive my WRE54G for some time. I’ve been having a heck of a time with getting it to work in Repeater Bridge Mode with my Westell 7500, but it’s getting closer. I’ll keep at it, but again thanks for posting!
Shaun August 30, 2018
Actually, it does have a n Ethernet port, flip up that little plastic square.
Jozer99 November 22, 2019 — Post Author
It depends on the revision. My revision does not include the flip up door or ethernet port.
Ryan October 3, 2019
Hello,
Any chance you still have the drivers available? When I try the links, This message appears:
“Not Found
Apologies, but the page you requested could not be found. Perhaps searching will help.”
earl June 26, 2020
Thank you for this Jozer! I just found my wre54g laying around, i havent used it since Linksys doesnt support it anymore (NO MORE FIRMWARE DOWNLOADS) and its still WEP, and the WPA on 1.06 fIrmware doesnt work. now it works great with the DDWRT.
Osim Kim October 6, 2020
Does WRE54G support WPA2 encryption?
Jozer99 October 7, 2020 — Post Author
I no longer have my WRE54G to test, but new versions of DD-WRT support WPA2 and even WPA3. I believe the old version I flashed my WRE54G to supported WPA2, but I can’t be sure. I put this post back up for archival purposes.